Video
- Concept of the month: ReplicaSets, Deployments, and Services (1658s)
- Demo of the month: Deploy Trino k8s to Amazon EKS (4891s)
- PR of the month: PR 8921: Support TRUNCATE TABLE statement (5681s)
- Question of the month: How do I run `system.sync_partition_metadata` with different catalogs? (5901s)
Audio
Trino Summit 2021
If you missed Trino Summit 2021, you can watch it on demand, for free!
Releases 365 and 366
Martin’s official announcement mentioned the following highlights:
Trino 365
- Aggregations in
MATCH_RECOGNIZE - Support for
TRUNCATE TABLE - Compatibility with Pinot 0.8.0
- HTTP proxy support for OAuth2 authentication
- Many improvements to Iceberg connector
Release notes: https://trino.io/docs/current/release/release-365.html
Trino 366
- Support for automatic query retries
- Support for
DENYsecurity rules - Performance optimizations
Release notes: https://trino.io/docs/current/release/release-366.html
Manfred’s additional notes:
- Cool new SQL like
TRUNCATE TABLEand support for time travel containsfunction for IP check in CIDR- Lots of performance and correctness fixes on Hive and Iceberg connectors
- Drop support for old Pinot versions
- Support for Hive to Iceberg redirects
- Automatic TLS for internal communication support for Java 17
And a last note, full Java 17 support is becoming a reality.
More detailed information is available in the 365 and 366 release notes.
To play around with query retries, you need to set the retry_policy session
variable to QUERY with the following command SET SESSION retry_policy=QUERY;
Log4Shell
There’s a new vulnerability in town that has the potential to affect Java projects that use some Log4j2 versions. It is called Log4Shell, and it does not affect Trino. Read the blog for more details.

Concept of the month: ReplicaSets, Deployments, and Services
In the first installment of Trinetes, we talked about what containerization is and why we use it. We covered the difference between tools like docker-compose and container orchestration systems like Kubernetes (k8s). Finally, we went over the first k8s object called a pod.
As a reminder, a pod is the basic unit of deployment in a k8s cluster. In this episode, we cover how to scale, deploy, and connect these pods. If you are missing some context, you should review the first installment of this series.
ReplicaSets
Replicas make one or more instances based on the same pod definitions. In k8s, the object used to manage replication is a ReplicaSet.
ReplicaSets provide high availability by managing multiple instances based on a pod definition in the k8s cluster. Kubernetes automatically brings up any failed pod instances that go down in a ReplicaSets based on the number of replicas you specify in the definition.
Replication also enables load balancing IO traffic over multiple pods. You gain the flexibility to scale up or down as traffic increases or decreases without any downtime.
To scale the number of pods in a live ReplicaSet, you can update the replicas
value in the ReplicaSet definition file, then running the following command to
update it:
kubectl replace -f replicaset-definition.yml
You can also edit the live ReplicaSet without changing the local file:
kubectl edit replicaset <replicaset-name>
Labels and selectors
Kubernetes objects have labels which are just key/value properties used to identify and dynamically group k8s objects. Labels should be meaningful and relevant to k8s users to easily comprehend things like which application, version, component, and environment certain objects belong to. Labels are shared across instances, and so they are not unique.
Selectors specify the grouping of instance to target a set of objects when deploying or applying other operations over these objects. For example, a ReplicaSet that identifies a set of pods with its selector to manage. When creating the ReplicaSet, k8s creates new pods defined in the ReplicaSet’s selector definition. If the pods crash, k8s brings up new pods and associates the new pods with the ReplicaSet.
Deployments
Deployment objects allow you to take a ReplicaSet, and perform actions on that set like creation, a rolling update, rollback, pod update, and so on.

Source: https://www.udemy.com/course/learn-kubernetes/
The best way to start making sense of these concepts is to look at the k8s configuration files.
helm template tcb trino/trino --version 0.3.0
Below is the generated deployment configuration,
trino/templates/deployment-worker.yaml with comments that delineate where
different sections of the configuration are defining.
#-------------------------Deployment-----------------------------
apiVersion: apps/v1
kind: Deployment
metadata:
  name: tcb-trino-worker
  labels:
    app: trino
    chart: trino-0.3.0
    release: tcb
    heritage: Helm
    component: worker
spec:
#-------------------------ReplicaSet-----------------------------
  replicas: 2
  selector:
    matchLabels:
      app: trino
      release: tcb
      component: worker
  template:
#----------------------------Pod---------------------------------
    metadata:
      labels:
        app: trino
        release: tcb
        component: worker
    spec:
      volumes:
        - name: config-volume
          configMap:
            name: tcb-trino-worker
        - name: catalog-volume
          configMap:
            name: tcb-trino-catalog
      imagePullSecrets:
        - name: registry-credentials
      containers:
        - name: trino-worker
          image: "trinodb/trino:latest"
          imagePullPolicy: IfNotPresent
          env:
            []
          volumeMounts:
            - mountPath: /etc/trino
              name: config-volume
            - mountPath: /etc/trino/catalog
              name: catalog-volume
          ports:
            - name: http
              containerPort: 8080
              protocol: TCP
          livenessProbe:
            httpGet:
              path: /v1/info
              port: http
          readinessProbe:
            httpGet:
              path: /v1/info
              port: http
          resources:
            {}
ConfigMap
You may have noticed that the pods define volumes that are referring to an object called ConfigMap. This is a way to store non-confidential data in the form of key-value pairs.
ConfigMaps are how the Trino chart loads the Trino configurations
in the /etc/trino directory on the containers. The ConfigMap file,
trino/templates/configmap-worker.yaml, defines the files loaded into the
worker nodes. The only real difference of the ConfigMap is in the
config.properites file specifying if the node is a coordinator or not.
apiVersion: v1
kind: ConfigMap
metadata:
  name: tcb-trino-worker
  labels:
    app: trino
    chart: trino-0.3.0
    release: tcb
    heritage: Helm
    component: worker
data:
  node.properties: |
    node.environment=production
    node.data-dir=/data/trino
    plugin.dir=/usr/lib/trino/plugin

  jvm.config: |
    -server
    -Xmx8G
    -XX:+UseG1GC
    -XX:G1HeapRegionSize=32M
    -XX:+UseGCOverheadLimit
    -XX:+ExplicitGCInvokesConcurrent
    -XX:+HeapDumpOnOutOfMemoryError
    -XX:+ExitOnOutOfMemoryError
    -Djdk.attach.allowAttachSelf=true
    -XX:-UseBiasedLocking
    -XX:ReservedCodeCacheSize=512M
    -XX:PerMethodRecompilationCutoff=10000
    -XX:PerBytecodeRecompilationCutoff=10000
    -Djdk.nio.maxCachedBufferSize=2000000

  config.properties: |
    coordinator=false
    http-server.http.port=8080
    query.max-memory=4GB
    query.max-memory-per-node=1GB
    query.max-total-memory-per-node=2GB
    memory.heap-headroom-per-node=1GB
    discovery.uri=http://tcb-trino:8080

  log.properties: |
    io.trino=INFO
The only other ConfigMap defines the catalog properties files
in the /etc/trino/catalog folder. This ConfigMap only defines two catalogs.
They expose the TPC-H and TPC-DS benchmark datasets.
apiVersion: v1
kind: ConfigMap
metadata:
  name: tcb-trino-catalog
  labels:
    app: trino
    chart: trino-0.3.0
    release: tcb
    heritage: Helm
    role: catalogs
data:
  tpch.properties: |
    connector.name=tpch
    tpch.splits-per-node=4
  tpcds.properties: |
    connector.name=tpcds
    tpcds.splits-per-node=4
Networking
Unlike in the Docker world, where it runs on the host directly where you can expose the container, pods in a k8s cluster run in a private network. Kubernetes exposes the internal IP address of the pod with the IP address of the k8s node and a unique port.
These IP addresses can be used to address pods internally, it’s not a good idea as these IP addresses are dynamic and subject to change upon termination and recreation. For this, you set up routing that handles addressing via pod name vs IP address.
When you have multiple k8s nodes, you have multiple IP addresses set up for the nodes. The routing software must be set up to handle the assignment of the internal networks to each nodes to avoid conflicts across the cluster. This type of functionality exists in cloud services, such as Amazon EKS, Google GKE, and Azure AKS.
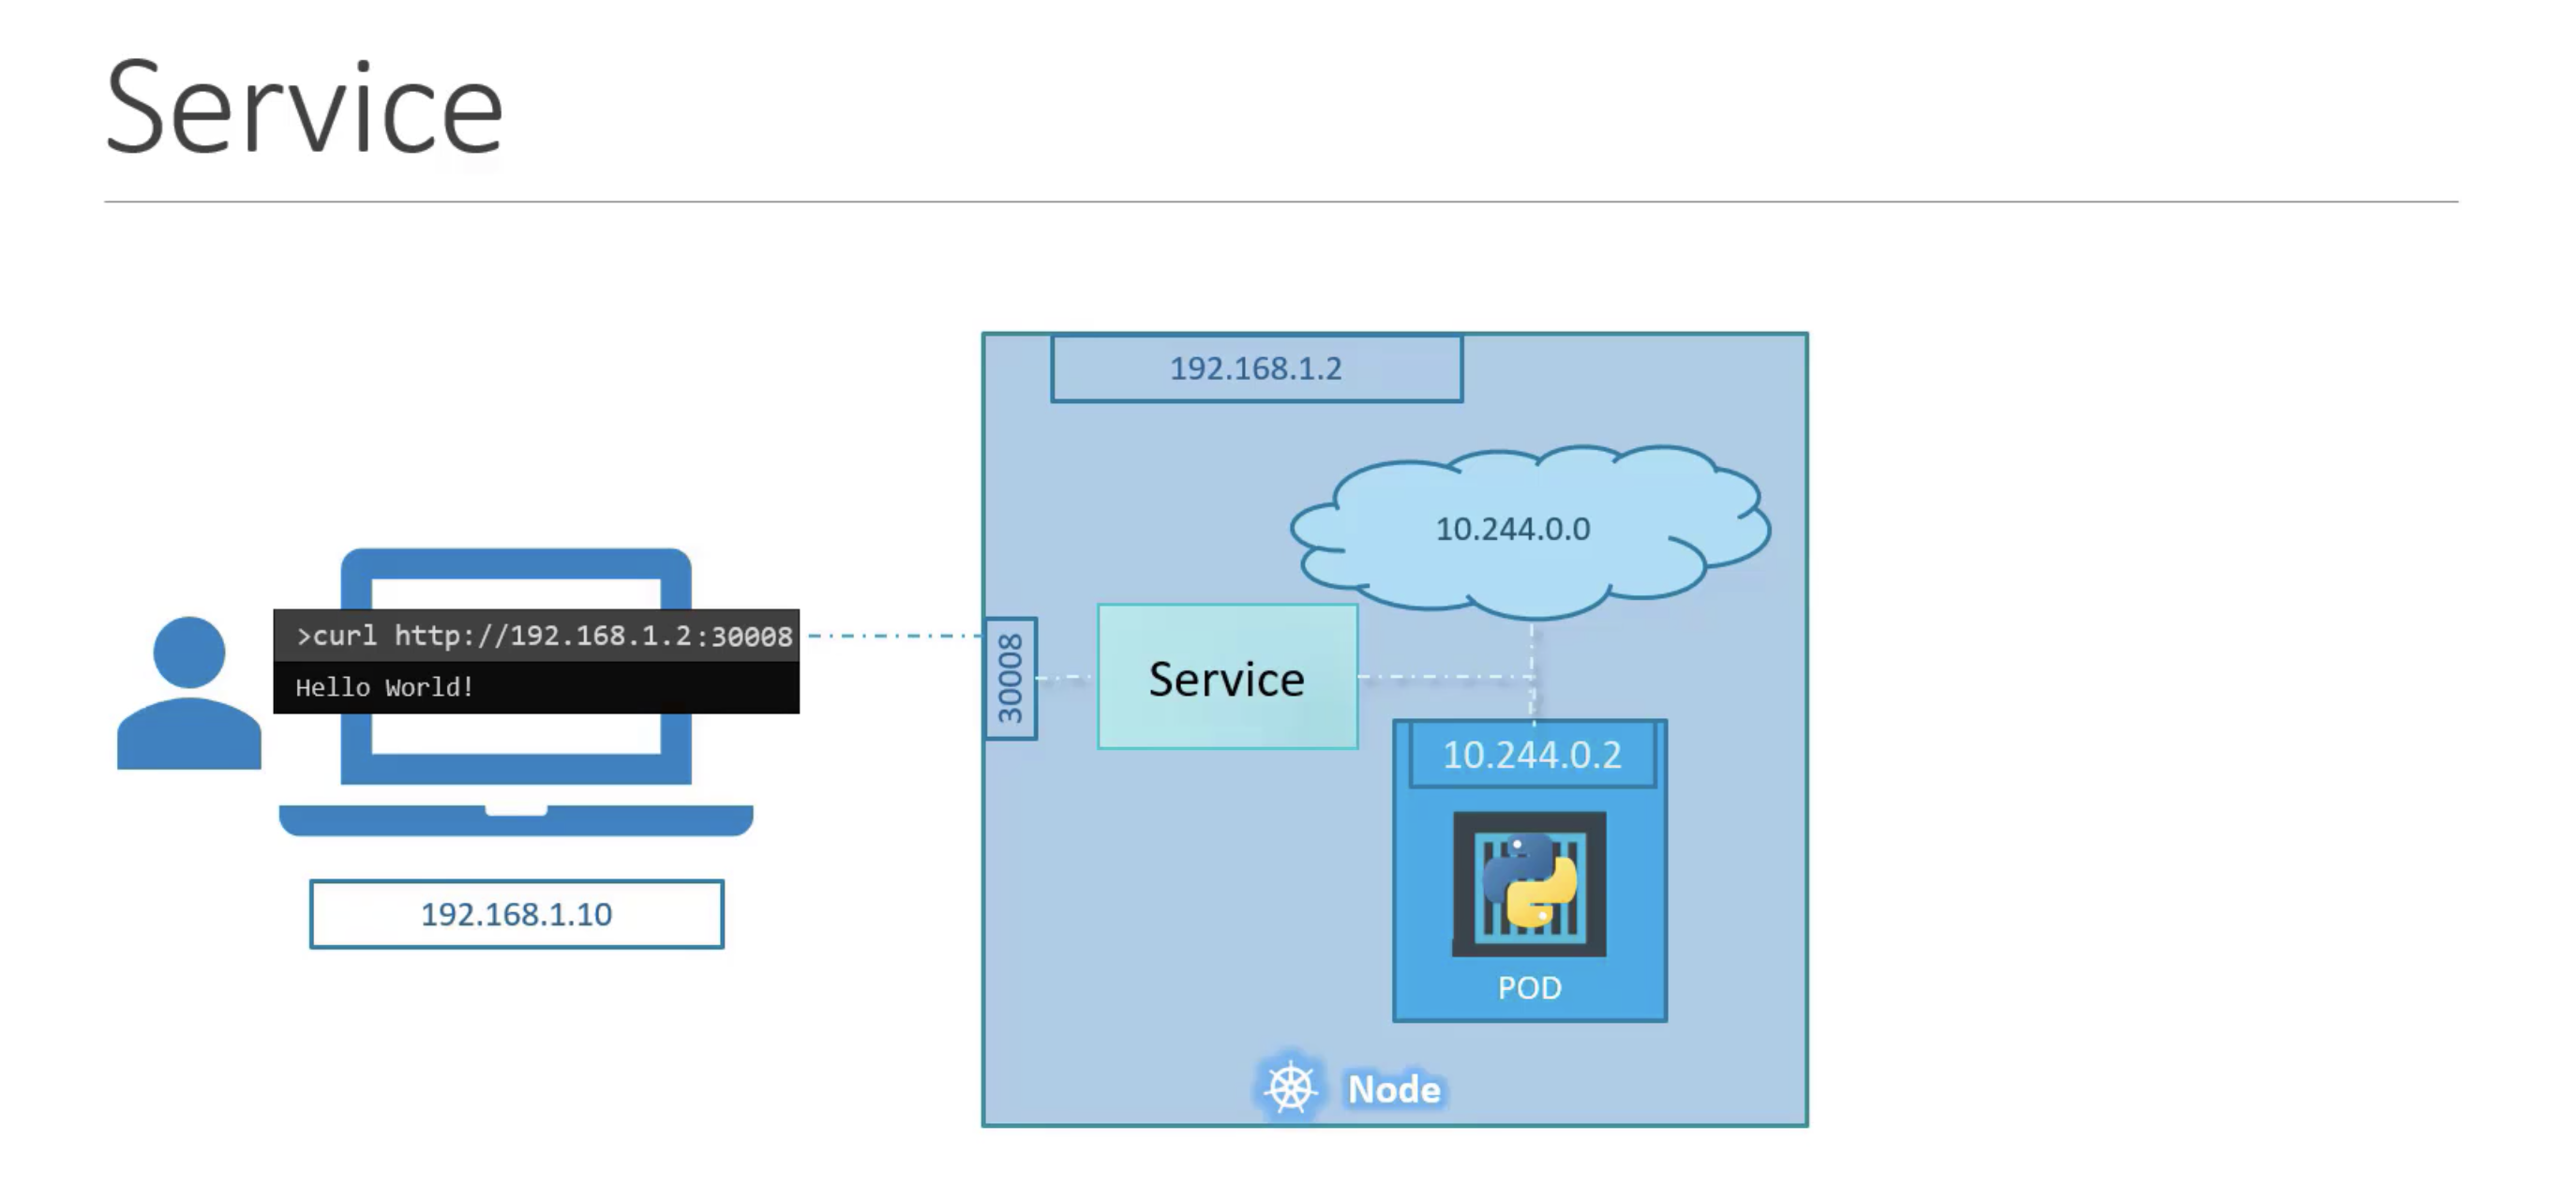
Services
Services establish connectivity between different pods and can make pods available from the external k8s node IP address. This enables loose coupling between microservices in applications.
The above example is showing a NodePort service. There are three service types.
- ClusterIP - the service creates a virtual IP inside the cluster to enable
communication between different services. This service is the default when you
don’t specify a
typevalue underspecin the configuration. - NodePort - is used to expose the internal address of a pod using the IP address and port of the node it is running on.
- Load Balancer - this service creates a load balancer for the application in
supported cloud providers. We won’t cover this one, but this is used when
we create our cluster in EKS using the
eksctl.
Here’s a diagram of the ClusterIP networking between different ReplicaSets.

Source: https://www.udemy.com/course/learn-kubernetes/
NodePort’s establish connectivity to a specific ReplicaSet of pod instances. It cannot make a generically accessible IP address for services to communicate between one another.
In our case, we configure an external IP address for the coordinator. The Helm chart defines a ClusterIP service to accomplish this. Notice the selector targets the Trino app, the release label, and only the coordinator component, which we know is one node.
apiVersion: v1
kind: Service
metadata:
  name: tcb-trino
  labels:
    app: trino
    chart: trino-0.3.0
    release: tcb
    heritage: Helm
spec:
  type: ClusterIP
  ports:
    - port: 8080
      targetPort: http
      protocol: TCP
      name: http
  selector:
    app: trino
    release: tcb
    component: coordinator
NodePort
The NodePort Service type, creates a proxy service to forward traffic to a specific port on the node from the pod.
Source: https://www.udemy.com/course/learn-kubernetes/
There are three ports when setting up a NodePort.
- TargetPort - is the port number on the pod itself, where the service forwards to.
- Port - is the port used by the service.
- NodePort - is the port that is exposed by the worker node and made available externally. NodePorts can only be in the range of 30000 - 32767.
The only required port to set is port. By default targetPort is the
same as port and nodePort is automatically assigned a free port in the
allowed range. ports is also an array which is why the - char is used.
Amazon EKS (Elastic Kubernetes Service)
Amazon EKS is a managed container service to run and scale Kubernetes applications in the cloud. EKS provides k8s clusters in the cloud for you without your having to manage the whole k8s services and platform. Unlike with your own k8s cluster, you can’t log into the control plane node in EKS, although you won’t need to. You are able to access workers which are usually EC2 nodes.
There are many steps involved in setting up a Kubernetes cluster
on EKS, unless you use a simple command line tool called eksctl that
provisions the cluster for you.
eksctl
From the eksctl website:
eksctlis a simple CLI tool for creating and managing clusters on EKS - Amazon’s managed Kubernetes service for EC2. It is written in Go, uses CloudFormation, was created by Weaveworks and it welcomes contributions from the community. Create a basic cluster in minutes with just one command.
Demo of the month: Deploy Trino k8s to Amazon EKS
First, you’ll need to install the following tools if you haven’t done so already:
Then you need to add your IAM credentials to the
~/.aws/credentials file.
Check the latest k8s version that is available on EKS. https://docs.aws.amazon.com/eks/latest/userguide/kubernetes-versions.html
eksctl create cluster \
 --name tcb-cluster \
 --version 1.21 \
 --region us-east-1 \
 --nodegroup-name k8s-tcb-cluster \
 --node-type t2.large \
 --nodes 2
The command completed in 10 to 15 minutes. This is the first output you see:
2021-12-16 01:25:17 [ℹ]  eksctl version 0.76.0
2021-12-16 01:25:17 [ℹ]  using region us-east-1
2021-12-16 01:25:17 [ℹ]  setting availability zones to [us-east-1a us-east-1e]
2021-12-16 01:25:17 [ℹ]  subnets for us-east-1a - public:192.168.0.0/19 private:192.168.64.0/19
2021-12-16 01:25:17 [ℹ]  subnets for us-east-1e - public:192.168.32.0/19 private:192.168.96.0/19
2021-12-16 01:25:17 [ℹ]  nodegroup "k8s-tcb-cluster" will use "" [AmazonLinux2/1.21]
2021-12-16 01:25:17 [ℹ]  using Kubernetes version 1.21
2021-12-16 01:25:17 [ℹ]  creating EKS cluster "tcb-cluster" in "us-east-1" region with managed nodes
After some time, you notice that two ec2 instances have come up. The final output of the tool should look like this.
2021-12-16 02:00:17 [ℹ]  waiting for at least 2 node(s) to become ready in "k8s-tcb-cluster"
2021-12-16 02:00:17 [ℹ]  nodegroup "k8s-tcb-cluster" has 2 node(s)
2021-12-16 02:00:17 [ℹ]  node "ip-192-168-2-123.ec2.internal" is ready
2021-12-16 02:00:17 [ℹ]  node "ip-192-168-55-167.ec2.internal" is ready
2021-12-16 02:00:18 [ℹ]  kubectl command should work with "~/.kube/config", try 'kubectl get nodes'
2021-12-16 02:00:18 [✔]  EKS cluster "tcb-cluster" in "us-east-1" region is ready
Take special note that eksctl overwrote your k8s configuration to point you to
the EKS cluster instead of a local cluster. To test that you can connect, run:
kubectl get nodes
You should see two nodes running. Now everything is simple. All you have to do to install Trino is reuse the Helm chart that we used to locally deploy Trino. Now, with the exact same command, you deploy to EKS since the tool updated your settings.
helm install tcb trino/trino --version 0.3.0
After you’ve installed the Helm chart, wait a minute or two for the Trino service to fully start and run:
kubectl get deployments
You should see the output that the coordinator and both workers are available.
NAME                    READY   UP-TO-DATE   AVAILABLE   AGE
tcb-trino-coordinator   1/1     1            1           67s
tcb-trino-worker        2/2     2            2           67s
To connect to the cluster, the Helm output gives pretty good instructions on how to create a tunnel from the cluster to your local laptop.
Get the application URL by running these commands:
  export POD_NAME=$(kubectl get pods --namespace default -l "app=trino,release=tcb,component=coordinator" -o jsonpath="{.items[0].metadata.name}")
  echo "Visit http://127.0.0.1:8080 to use your application"
  kubectl port-forward $POD_NAME 8080:8080
Run that, then go to http://127.0.0.1:8080, and you should see the Trino UI.
To clear out the Helm install, run:
kubectl delete service --all
kubectl delete deployment --all
kubectl delete configmap --all
To tear down the entire k8s cluster, run:
eksctl delete cluster --name test-cluster --region us-east-1
PR of the month: PR 8921: Support TRUNCATE TABLE statement
This weeks PR of the month
implements TRUNCATE TABLE. This command is very similar to DELETE statements,
with the exception that it does not perform deletes on individual rows. This
ends up becoming a much faster operation that DELETE as it uses fewer system
and logging resources.
Thanks to Yuya Ebihira for adding the support for TRUNCATE TABLE.
Question of the month: How do I run system.sync_partition_metadata with different catalogs?
This week’s question of the month comes from Yu on Slack. Yu asks:
Hi team, in the following system procedure, how can we specify the catalog name?
system.sync_partition_metadata(schema_name, table_name, mode, case_sensitive)We are using multiple catalogs and we need to call this procedure against non-default catalog.
I answered this with a link back to our fifth episode :
You need to set the catalog either in the jdbc string as I do in the video, or you need to set the session catalog variable, https://trino.io/docs/current/sql/set-session.html
Events, news, and various links
Blogs and resources
- Run Trino/Presto on Minikube on AWS
- Trinetes I: Trino on Kubernetes TCB episode
- DIY Analytics Platform
- AWS EKS - Create Kubernetes cluster on Amazon EKS: the easy way
Trino Meetup groups
- Virtual
- East Coast (US)
- West Coast (US)
- Mid West (US)
If you want to learn more about Trino, check out the definitive guide from OReilly. You can download the free PDF or buy the book online.
Music for the show is from the Megaman 6 Game Play album by Krzysztof Słowikowski.